How To Remove Your Address In Mailchimp Confirmations & Footer
Last Updated: 7th January 2025
Home » Blog » Lifestyle » Blogging »One of Wild Lovely World’s readers told me that after they signed up to my mailing list and received a subscription confirmation email, my personal postal address was written at the bottom of the email! Whoops! (P.s. Thank you so much for letting me know!)
Unfortunately, this is a common occurrence for users of Mailchimp, particularly beginner bloggers with a small following who are using Mailchimp for free. You’ve probably found this post because you’ve realised this is happening to you and you’re wanting to know how to hide your own address, am I right?
Thankfully, hiding and removing your address from Mailchimp confirmation emails is easy once you know how. This post will show you how to hide/remove your address from Mailchimp confirmations in simple, easy steps so that you can keep your address private!
Why Your Address Is Showing On Your Mailing List Subscription Confirmations
Mailchimp requires users by law to include a physical postal address so that people who sign up for your mailing list can contact you should they need to. There is no option to leave this blank!
I use Mailchimp for free because I think it is a great service for beginners to blogging to set up a mailing list. Building your mailing list is a great idea and I recommend you start doing this as soon as you start blogging. (Psstt… You can sign up for my mailing list below! 😉 )…
That said, what about bloggers who do not have a business address? As a newbie blogger, you may not have an office or a registered business address that you can use as an address. So, you will likely need to use your personal address when signing up for Mailchimp.
Unfortunately, that means that your personal address will be visible to new subscribers (under Mailchimp’s default settings that is!). Not good, right? We need to keep that private! So how do we do it?
It’s actually not as difficult as you might think. Thankfully, it is an easy process once you know how. I will show you how to hide your address from Mailchimp confirmation emails in a few easy steps.
How To Check Your Address Details On Mailchimp
You will likely have entered a mailing address when you signed up for Mailchimp in the first place. But in case you forgot what you entered, here is how to check it.
To check what address you currently have listed on Mailchimp, follow these two steps:
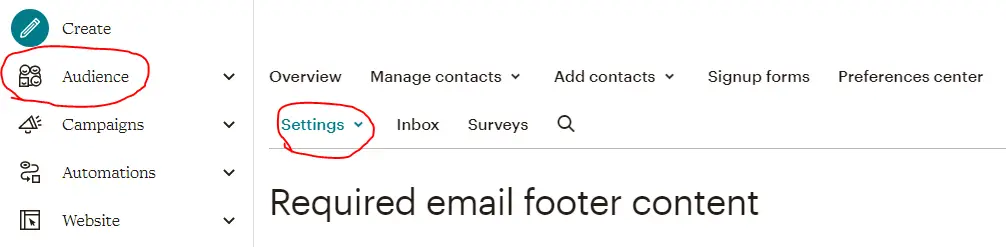
- Go to the ‘Audience’ you want to manage in the Mailchimp menu. Your ‘Audience’ is all the people signed up to your mailing list. You can go to the Audience dashboard and click on ‘Manage’, or you can go to ‘All Contacts’.
2. Click ‘Settings’ and go down to ‘Required email footer content’. Scroll down to ‘How can recipients contact you’. Here you can see what information will be displayed in emails sent to your Mailchimp subscribers. This is where your mailing address information is pulled from when inserted into Mailchimp confirmation emails.
In this section, you can change your address on Mailchimp to a business address if you have one, and leave it at that. However, if you are using your personal home address for your Mailchimp account, then you should hide/remove it from emails that are sent out to your subscribers. I will show you how to do this in the steps below.
How To Hide/Remove Your Address In Mailchimp Confirmations
When someone subscribes to your mailing list, they will enter their email address. Mailchimp will then send them an email to get them to confirm their subscription. When they do this, they will confirm their humanity using a reCAPTCHA followed by a ‘Subscription Confirmed’ message. The ‘subscription confirmed message’ is what Mailchimp will automatically add your address to!
This is how to remove or hide your address from Subscription Confirmations in just five easy steps:
- Go to ‘Audience’ and click on ‘Signup forms’. Then locate ‘Form Builder’ which is the first option in the menu. Click on ‘Select’.
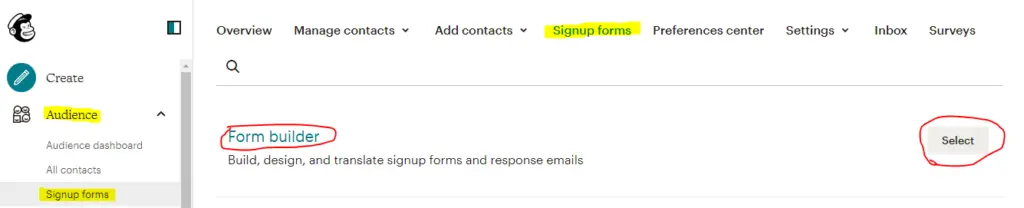
2. In the ‘Form Builder’, you will be able to see all of the ‘Forms and response emails’ that Mailchimp will use for people on your mailing list. You will be able to edit and design all of your Mailchimp forms here.
3. From the drop-down menu, locate the section ‘Subscribe’ and under it ‘Confirmation thank you page’
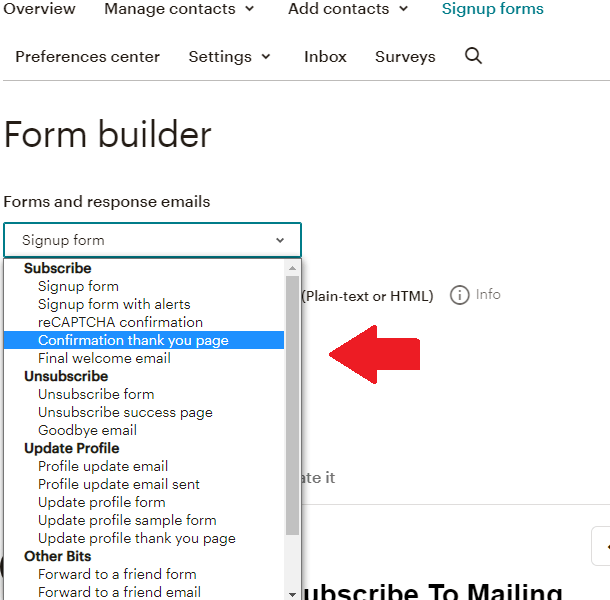
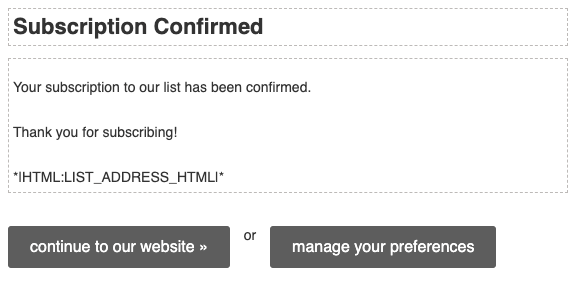
4. Scroll down and you will see the form pictured below. This is your ‘Confirmation thank you page’ and it is what the Subscription Confirmation email that is sent to your new subscribers looks like. Anyone who signs up to your mailing list and confirms their subscription will automatically receive this from Mailchimp.
The code that inserts your address is ‘*|HTML:LIST_ADDRESS_HTML|*‘. So all you need to do to hide your address in Mailchimp confirmations is to delete this code!
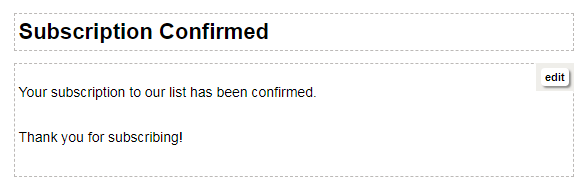
5. To delete it, just click on ‘edit’ when hovering over the form. You can add or remove whatever text you like from the form. Once you’re done, just click ‘save and close’ and you’re done!
You’ve successfully hidden/removed your address from Mailchimp confirmations!
How To Hide/Remove Your Address From Mailchimp Confirmations – Solved!
Thanks so much for reading! I hope that this post has resolved any issues you may have had with your address showing on your emails from Mailchimp. If you have any further questions, don’t hesitate to contact me.
Did you find this article useful? Let me know in the comments or join me on X, Threads, Facebook, Pinterest and Instagram.
If you enjoyed this post, share it with a friend! 💌
Join my Facebook Group WildLovelyWanderers!
Say thanks and send me a virtual coffee on Ko-Fi!☕

Lauren | Wild Lovely World
Lauren is a travel writer from the U.K., specialising in travelling on a budget as a solo female and in a couple. She moved to Australia solo at age 19 and has since lived in 7 different countries around the world, including teaching English in Japan, living in a campervan in New Zealand and hiking all across Scotland. Her style is travelling slow and she is an expert on moving abroad and long-term travel. She’s on a mission to inspire adventure and show you how to travel for longer, for cheaper and have more authentic travel experiences.